Cinematography is the art of making a composition on screen that is visually pleasing and progresses the film’s story properly. It is a skill that takes a long time to master, but a few important skills will greatly improve even the beginner’s work. This cinematography training will teach some basic fundamentals that will give beginning filmmakers a head start.
The Third Dimension
Film and video, by their nature, are actually 2-dimensional mediums. The secret to making a pleasing visual is to trick the eye using depth-of-field, movement, and lighting to create the appearance of the third dimension. When these are done properly, the viewer feels as if they are in the world of the story and can more easily relate to the action and the characters.
Depth-Of-Field
 Depth-of-field refers to the band of space in front of the camera that is in focus. This is the panacea of beginning filmmakers, it is the primary visual appearance that makes a movie look like it was shot on film.
A deep depth-of-field means that this band is large and encompasses most of what’s in front of the camera. Objects both near and far are all in focus. This is common with cheaper cameras using cheap lenses. The more that is in focus, the less control the director has over what the audience’s eyes are focusing on.
A narrow depth of field means that very little is in focus, blurring the objects both nearer and farther from the camera than the subject. This can be very beneficial to cinematography in that the director and cinematographer can control what the audience looks at on screen.
Examples
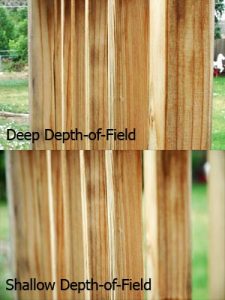
 In the example here, the top image demonstrates how much of the photo is in focus while the bottom shows only one of the railing posts in focus. Compare the horse in the background. In the shot above, the horse is easily distinguishable and in the bottom photo it is completely unrecognizable. The shallower the depth of field, the closer to the all elusive film look you will get.
The human eye, through years of training, avoids things that are out of focus. Anything appearing on screen that is blurry is unpleasant to look at and the eyes will scan the image to find what is in focus and concentrate on that.
To accomplish shallow depth-of-field, use low f-stop settings, a long focal length lens, and zoom in on your subject. Often it requires special adapters to create the additional focal length, but these units are expensive and often require advanced focusing skills to get good results.
A simple trick to maintaining low F-stop settings (iris open wider) is to increase shutter speed, but not too much or you lose your motion blur. ND, or neutral density, filters can help reduce light and allow for longer exposures with a wider iris.
Another key is to use a camera with a larger sensor as this approaches 35mm film’s imaging size. Many low-end consumer and even professional video cameras use very small sensors. Typically 1/2″ or smaller chips. The comparison chart below shows the difference in chip size:
Larger sensors lend themselves to better depth of field. The latest digital SLR cameras have much larger sensors than video cameras and many now have the ability to shoot HD video.
One caution about using shallow depth-of-field: don’t be too overzealous. While it makes your movie appear that it was shot with a film camera, it can detract in some situations. Incorporating it should be done when necessary and if possible.
Rack Focus
Rack focus, also called Pull Focus, is the art of changing what is in focus in your image as the shot progresses. This is usually done when two characters are talking on screen and the director wants the viewer to change their attention from one character to another. The camera operator (or in a more complex film, the focus puller) will adjust the focus as necessary to bring attention to different parts of the scene.
Rack focus can be effective if done correctly. Unfortunately, if not done properly, can take the viewer out of the moment you were trying to create. Use it well, or don’t use it. If you can’t master this technique, expand your depth-of-field and keep both subjects in focus simultaneously.
To properly do a rack focus make sure you set your focus points prior to shooting. Get a reference focus at each focal point and mark it on the focus ring of your camera. Then, when filming, change your focus as necessary from point to point. Be warned, however, that on many cameras the focus ring can spin past the near and far maximums and your reference points may no longer match. If this happens, you will have to re-reference your focal points.
Camera Movement
Creating movement in the scene significantly improves the appearance of the third dimension. Motion creates parallax and makes it more obvious to the viewer that the characters live in a 3D world.
There are several types of camera motion that lend themselves to various meanings:
Handheld
Handheld motion results from holding your camera with your hands as you shoot. This results in shaky movement in your video. This can actually be desired if you wish to have more of a natural feel to your shot, or if the action is frenetic and you wish to convey confusion and reaction.
Dolly
A dolly is a small platform or car that rides on a track. The camera and tripod are mounted to the car and the car rolls along a flat surface or a track. The movement is very fluid and smooth. This can be used to follow actors talking, push in toward an actor, or pull back for various effects.
Jib
While a dolly makes for horizontal movement, a jib is a crane that allows the camera to move vertically. Use a jib for establishing shots, reveals, and to follow action. Jib shots add production value, but can be distracting if overused.
In addition to moving the camera, you can create an additional sense of motion by simply positioning objects nearer the camera than the subject and move the camera past them as the scene unfolds. For example, allow tree branches to drift across the frame as you focus on your characters. Shallow depth-of-field will keep the object blurry and maintain interest in your subject, but will remind the viewer subconsciously that this is a 3D world they are experiencing.
Continuity
Continuity is the art of maintaining movement and direction in a scene so that characters move in a continuous direction, or speak facing the proper way. If these rules are broken, the viewer can get confused as to the placement or movement of the characters. When this happens, the viewer tries to figure out the positioning and movement of the characters and may miss key points of the dialog or action.
Directional Continuity
When characters are traveling, it is important to maintain their direction on screen. If they are moving left to right in one shot, then change direction and move right to left in the next, the audience begins to wonder if the character changed directions. Again, this takes the viewer out of the story and confuses them.
When characters are traveling in one direction, maintain that direction. If necessary, reposition your camera so that the action happens consistently.
Changing directions requires a shot where the character(s) actually change their route and move in the new direction. Without this visual, the audience is lost.
When dialog is concerned, make sure that characters are facing each other and that they face the same direction throughout the scene. This is called the 180 degree rule and it refers to the fact that camera should stay on one side of the conversation, otherwise the characters will appear to be speaking away from each other. To utilize this rule, simply draw a mental line through the dialog action (the two actors), keep your camera on one side of this line at all times.
If it becomes necessary to move the camera, such as when a new character enters the scene, or action repositions one of the actors, fall back to a wide shot to show the new line. Then, follow the rule until the action changes again.
More to follow…